
ECO MASTER 5. Operation
This chapter explains how to operate the machine.
In an emergency, you may turn off the Power supply switch on the bottom of changer.
Remove the discs that need to be repaired from their cases. Put the cases aside and place the discs on the “stocker” in the changer unit (see item 25 on page 11.) Make sure you put the discs in the changer unit with THE LABEL SIDE DOWN and push them back to the white posts. (See photo below.) The changer will not handle more than 50 discs at a time. Remember, the side to be repaired must be “up.” For double sided discs, repair one side and then reload the disc with the “other” side facing upwards. Always close the changer door and the latch before running the machine.
When repairing discs in the Eco Master it is helpful to visually inspect the discs and sort them. Look for discs that are “heavily damaged” and put them in one pile. Then put discs that are “scratched” in another pile and those that are only “lighted scuffed” in a third pile. Now you can select the type of repair that is appropriate and most efficient for each stack. It requires a little experience to classify the discs but most operators learn this very quickly.
This procedure may take a minute extra but it saves time in the long run. It is also better for the discs. For example, if all discs were run in the “deep” mode, whether they needed it or not, it would take extra time for the extra stages of repair. In addition, the discs would be sanded down more than necessary. You can repair a disc many times in the Eco Master with excellent results. However, it is always best to repair discs at the least aggressive level to get the job done.
Now, follow the directions on the next pages.
*The machine will stop after all the discs have been picked up from the “stocker” or after the machine tries (and fails) three times to pick up a disc in the Changer.
“CD”: Select this to repair CD’s. (Audio, some games, data) “DVD”: Select this to repair DVD’s. (Movies, High Density Discs) Note: Selecting “DVD” plus “Sanding” or “Deep” mode is prohibited.
NOT PENS, PENCILS, ETC.
You may use the “CD, Deep” setting to remove heavy scratches in a DVD one time, no more! Most repairs, however, are accomplished very well in the “DVD, Medium” mode (or lighter) for both CD’s and DVD discs.
Press “Check”: When you need to check several states of the machine, for example, usage of water, Filters, and Pads, etc., push here. (See 5.6.Check)
To repair discs:
1. Load the discs, prime the fluids, install the output spindle, etc.
2. Select media type (CD, DVD)
3. Select repair mode (Deep, medium, light, etc.)
4. Press “START”
It’s really that easy! You may leave the machine and come back later to retrieve your repaired discs. If you remove discs from the output spindle while the machine is running, make sure you put it back for the next repaired discs coming out of the unit. Close the changer door and latch it! For sanding repairs, read on . . .
Replacing Consumable items
Now that you are repairing discs, you need to know about replacing the supply items. The following items assume that the machine is cleaned regularly as described later in this manual.
Replace all of the colored pads (but not the #1 foam pad) every 40-50 discs. Replace the #1 foam pad every 250 discs (more frequently if pad is heavily worn.)
Change the polish water (water/“D” solution) every 250 discs or when the water looks milky, whichever comes first. If water level is low just add some more. Replace the 1st. tank filter at this time (every 250 discs.) Clean both inner and outer pipes carefully at this time. Replenish the compound when the bottle gets down to only 1/3 full.
Replace the Reactor pipe when the water gets milky quickly or every 1500 discs. Replace the Inner pipe if it has brown or red corrosion on it.
Game Cube discs
Game cube discs may be repaired on the ECO MASTER. They require a special adapter to hold them and they may only be processed one at a time. Do not put more than one of them on the loading stack. Process the one disc and then put another game cube in the holder and do that one.
5.4.2 Sanding (For very deep scratch removal on CD’s only)
The screen below is displayed when you touch “Start” in the “Sanding” mode. This is only for BADLY damaged CD’s, not DVD’s. The machine starts operating when you select a sanding level and touch “OK”.
“Level 3”: Discs are sanded three times as hard as “Level 1”.
“Level 2”: Discs are sanded twice as hard as “Level 1”.
“Level 1”: Discs are sanded as hard as “Deep” mode.
Push POWER/PAUSE Switch if you want to pause the machine.
5.7.1 Running total
Total run-time of each item is displayed. If something needs to be exchanged, “Clear” will turn black and white. Be sure to display these screens and touch “Clear” for each item after replacing it. Run the machine pumps to confirm proper operation after renewing Water or Filters. Do the same after supplying Compound.
*1st Filter has two timers internal to the machine. If either of them reaches the limit, you have to renew the 1st Filter and clear it.
“Mode”
Pushing this button allows the setup parameters of a Mode to be changed.
Automatic Power OFF Mode
ON: The power supply is cut off automatically when process is completed and an error doesn't occur.
OFF: The power supply is not cut off automatically.
Cartridge Retry Mode in the Changer
ON: Picking-up action will be attempted 3 times if a disc was not picked up by the vacuum.
OFF: The vacuum Picking-up action will only occur once.
When you want to run the Water Pump, or the Compound Pump, touch “ON” to start and “OFF” to stop them. After priming of the tubing is done they should be OFF for normal machine operation.
5.7.2 Warning
This “Warning” screen will be displayed if “Clear” is touched for an item. Touch “OK” when you want to clear the item selected, and “Cancel” when you don’t.
5.7.3 Repair history
Total number of Discs repaired is displayed by the kind of Disc and mode, respectively.
*You can’t clear these counts.
Contents.
5.1. Power on
After turning on POWER/PAUSE Switch, the machine starts initialization.
5.2. Power off
The machine power will shut down by pushing (and holding) the POWER/PAUSE switch for 4 seconds when the Main menu screen is showing.In an emergency, you may turn off the Power supply switch on the bottom of changer.
5.3. Initialization
The initialization of the machine is done for self checking when the power supply is turned ON or when an error occurs. Messages below are displayed during initialization. Then, the menu for operations will be displayed.
5.4. Select Menu - Repairing Discs
Repairing your first discsRemove the discs that need to be repaired from their cases. Put the cases aside and place the discs on the “stocker” in the changer unit (see item 25 on page 11.) Make sure you put the discs in the changer unit with THE LABEL SIDE DOWN and push them back to the white posts. (See photo below.) The changer will not handle more than 50 discs at a time. Remember, the side to be repaired must be “up.” For double sided discs, repair one side and then reload the disc with the “other” side facing upwards. Always close the changer door and the latch before running the machine.

When repairing discs in the Eco Master it is helpful to visually inspect the discs and sort them. Look for discs that are “heavily damaged” and put them in one pile. Then put discs that are “scratched” in another pile and those that are only “lighted scuffed” in a third pile. Now you can select the type of repair that is appropriate and most efficient for each stack. It requires a little experience to classify the discs but most operators learn this very quickly.
This procedure may take a minute extra but it saves time in the long run. It is also better for the discs. For example, if all discs were run in the “deep” mode, whether they needed it or not, it would take extra time for the extra stages of repair. In addition, the discs would be sanded down more than necessary. You can repair a disc many times in the Eco Master with excellent results. However, it is always best to repair discs at the least aggressive level to get the job done.
Now, follow the directions on the next pages.
5.4.1 Main menu screen - Disc Repair
The menu for operations is displayed after initialization. Select Disc and mode, and touch the “Start” after placing discs in the Changer. The machine will start to repair discs. Several messages (demands for replacing water, Filters, and Pads, etc.) are displayed in “Message Display” area of the screen. You won’t be able to start operations if messages are displayed there.*The machine will stop after all the discs have been picked up from the “stocker” or after the machine tries (and fails) three times to pick up a disc in the Changer.

“CD”: Select this to repair CD’s. (Audio, some games, data) “DVD”: Select this to repair DVD’s. (Movies, High Density Discs) Note: Selecting “DVD” plus “Sanding” or “Deep” mode is prohibited.
NOT PENS, PENCILS, ETC.
You may use the “CD, Deep” setting to remove heavy scratches in a DVD one time, no more! Most repairs, however, are accomplished very well in the “DVD, Medium” mode (or lighter) for both CD’s and DVD discs.

Press “Check”: When you need to check several states of the machine, for example, usage of water, Filters, and Pads, etc., push here. (See 5.6.Check)
To repair discs:
1. Load the discs, prime the fluids, install the output spindle, etc.
2. Select media type (CD, DVD)
3. Select repair mode (Deep, medium, light, etc.)
4. Press “START”
It’s really that easy! You may leave the machine and come back later to retrieve your repaired discs. If you remove discs from the output spindle while the machine is running, make sure you put it back for the next repaired discs coming out of the unit. Close the changer door and latch it! For sanding repairs, read on . . .
Replacing Consumable items
Now that you are repairing discs, you need to know about replacing the supply items. The following items assume that the machine is cleaned regularly as described later in this manual.
Replace all of the colored pads (but not the #1 foam pad) every 40-50 discs. Replace the #1 foam pad every 250 discs (more frequently if pad is heavily worn.)
Change the polish water (water/“D” solution) every 250 discs or when the water looks milky, whichever comes first. If water level is low just add some more. Replace the 1st. tank filter at this time (every 250 discs.) Clean both inner and outer pipes carefully at this time. Replenish the compound when the bottle gets down to only 1/3 full.
Replace the Reactor pipe when the water gets milky quickly or every 1500 discs. Replace the Inner pipe if it has brown or red corrosion on it.
Game Cube discs
Game cube discs may be repaired on the ECO MASTER. They require a special adapter to hold them and they may only be processed one at a time. Do not put more than one of them on the loading stack. Process the one disc and then put another game cube in the holder and do that one.
5.4.2 Sanding (For very deep scratch removal on CD’s only)
The screen below is displayed when you touch “Start” in the “Sanding” mode. This is only for BADLY damaged CD’s, not DVD’s. The machine starts operating when you select a sanding level and touch “OK”.

“Level 3”: Discs are sanded three times as hard as “Level 1”.
“Level 2”: Discs are sanded twice as hard as “Level 1”.
“Level 1”: Discs are sanded as hard as “Deep” mode.
5.5 During operations
The number of discs, the phase of repairing process, and the state of each process are displayed during automatic disc repair.Push POWER/PAUSE Switch if you want to pause the machine.

5.6 During a pause
Repairing will be resumed if “Continue” is touched. Operation will be terminated regardless of the phase of repairing process if “End” is touched.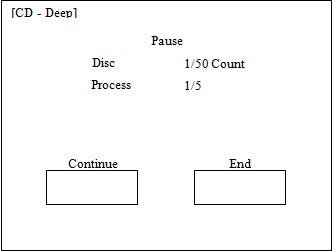
5.7 Check (Brings up many displays of statistics and parameters.)
You will see the screens below if you touch “Check” in the main Menu.
5.7.1 Running total
Total run-time of each item is displayed. If something needs to be exchanged, “Clear” will turn black and white. Be sure to display these screens and touch “Clear” for each item after replacing it. Run the machine pumps to confirm proper operation after renewing Water or Filters. Do the same after supplying Compound.

*1st Filter has two timers internal to the machine. If either of them reaches the limit, you have to renew the 1st Filter and clear it.
“Mode”
Pushing this button allows the setup parameters of a Mode to be changed.
Automatic Power OFF Mode
ON: The power supply is cut off automatically when process is completed and an error doesn't occur.
OFF: The power supply is not cut off automatically.
Cartridge Retry Mode in the Changer
ON: Picking-up action will be attempted 3 times if a disc was not picked up by the vacuum.
OFF: The vacuum Picking-up action will only occur once.

When you want to run the Water Pump, or the Compound Pump, touch “ON” to start and “OFF” to stop them. After priming of the tubing is done they should be OFF for normal machine operation.

5.7.2 Warning
This “Warning” screen will be displayed if “Clear” is touched for an item. Touch “OK” when you want to clear the item selected, and “Cancel” when you don’t.

5.7.3 Repair history
Total number of Discs repaired is displayed by the kind of Disc and mode, respectively.
*You can’t clear these counts.

5.8 Error Messages
They are displayed when an error with the machine happens. ERROR MESSAGES WILL OCCUR OCCASIONALLY. MANY TIMES THE PROBLEM IS RESOLVED BY REPLACING THE PAD THAT WAS IN USE AT THE TIME. Sometimes you will want to replace all the pads and reset the pad counters to zero. Most errors occur due to minor changes in water supply, certain conditions of the disc, condition of pads, centering of pad on the pad holder, etc. It is not a big problem. The computer electronics monitor all of the frictions, speeds and pressures. If all of these factors are not exactly what the machine expects, an error message may result. It does not mean that the machine is broken.

5.9 Error List

Contents.
- 1. Safety Precautions
- 1.1 Explanation
- 1.2 Table of Illustrated Symbols
- 1.3 Fundamental Matters of “WARNING!” and “CAUTION!”
- 1.4 Requirements for Installation
- 2. Contents of packing
- 3. Description and Function of Each Part
- 3.1 Main Body
- 3.2 Operation Part
- 3.3 Abrasive Unit
- 3.4 Loading Unit
- 3.5 Platen Unit
- 3.7 Pump and Water Recycle Unit
- 3.8 Pad Holders
- 4. Set Up
- 4.1 Set up Changer Unit and Power Supply
- 4.2 Set up Water Recycle System
- 4.3 Preparation for Operation
- 4.3.1 Setting spindle
- 4.3.2 Turning on the power
- 4.3.3 Preparation of Water and Compound
- MAIN DISPLAY
- 5. Operation
- 5.1. Power on
- 5.2. Power off
- 5.3. Initialization
- 5.4. Select Menu - Repairing Discs
- 5.4.2 Sanding (For very deep scratch removal on CD’s only)
- 5.5 During operations
- 5.6 During a pause
- 5.7 Check(Brings up many displays of statistics and parameters.)
- 5.7.1 Running total
- 5.7.2 Warning
- 5.7.3 Repair history
- 5.8 Error Messages
- 5.9 Error List
- 6. Maintenance
- 6.1 Supplement Compound
- 6.2 Supplement Water
- 6.3 Daily maintenance
- 6.4 Weekly maintenance
- 7. Caution
- 8. Service
- 9. Specifications
- 10. Wiring Diagram
- 11. Replacement Parts