
ECO SMART INSTRUCTION 5. How to use
5.1 Preparation before operation
1. You will need two containers, one for the treated water supply and the other for waste water.|
|

2. All water used in the machine must be treated with Solution D.
The proper ratio of Solution D to water is:
20 milliliters of “Solution D” per Gallon of water
It is important to use this ratio for proper disc finish.
Please use supplied measuring cup for Solution D.
3. The drain hose has to be connected to exit before repairing a disc.
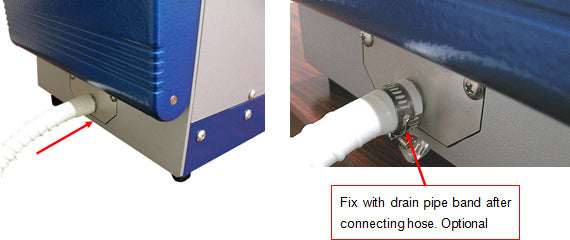
4. Put the water pick-up tube and drain hose into the each container.

5.2 Power on and off
1. Install the power cable securely into AC inlet on back of machine2. Connect power cord to wall receptacle securely.

|
|
Receptacle has to be grounded!
2. Turn ON the main power switch located above the AC inlet.
3. Initialization will start automatically. (LED display ST=”88”, TIME=”88”)
4. Front door will open after initialization is completed. (LED display ST=”0”, TIME=”0”)

5.3 Operation process for repairing disc
1. How to operate the water pump.Make sure the water supply pick-up tube is in the treated water container.
1) Turn ON the main power switch.
2) With the front door open press and hold “ST5” button and “STOP”.
3) Water pump will start operation.

4) Stop the water pump operation after the water comes out of one nozzle.
The water pump is stopped by pushing “STOP” button or “ST1-5”.
|
|
Make sure to prime the water lines before repairing a disc. This should be done on a daily basis. Not priming the water lines will result in bad disc finish and will cause the machine to give errors.
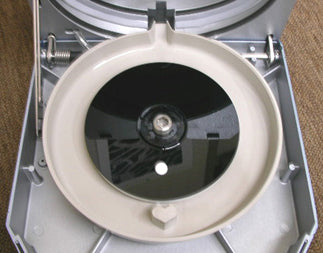
2. Set the disc on the Platen table. Side of disc to be repaired should be facing up.

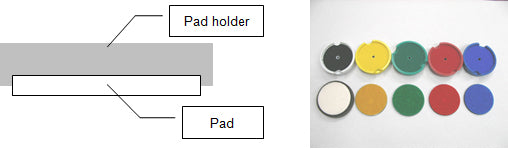
When installing a repair pad on a pad holder, make sure it is centered on the pad holder, so no part of the repair pad rides up on the raised lip of the pad holder.
|
|
Use the same color of pad and pad holder for the corresponding repair button. Wrong placement of the pads to repair button will cause poor disc finish.
3. Set the proper pad holder in the correct position to “Pad holder Plate” of main unit.

|
|

CLEAN AND POLISH: Pad 1 (Black) VERY LIGHT: Pad 2 (yellow) → Pad (Black) 1 LIGHT: Pad 3 (Green) → Pad 2 (Yellow) → Pad (Black) 1 MEDIUM: Pad 4 (Red) → Pad 3 (Green) → Pad 2 (Yellow) → Pad 1 (Black) DEEP: Pad 5 (Blue) → Pad 4 (Red) → Pad 3 (Green) → Pad 2 (Yellow) → Pad (Black) 1
Use the pads in order from largest to smallest number. No pads can be skipped!
4. Close the front door after confirming the disc is set properly on the Platen table (see page 16).
|
|
Running a repair process with no disc on the platen table will cause damage to the platen table rubber.
5. Press the start button, the repair process starts (Make sure the proper pad is installed before pressing the start button).

On level 5 you can extend the repair by pushing button 5 during repair process 5 (Repair time doubles by pressing it once and will triple by pressing it twice.) Use this function to repair deeply scratched discs

For level 1 repair: please follow the below instructions carefully, as it is a two part process
1) Push “ST1” button, the washing process will start. ST LED ”1” (“1.” during displaying
2) The front will door open automatically after finishing the washing process. (after the front door opens, the LED display is blinking).
3) Leave the pad 1 (Black) and disc in place, put one-drop of compound on the disc. Remember to shake the compound bottle before use.
4) The polish process will start automatically after closing the front door (ST LED blink stops, no need to press the start button again).
5) After repairing, perform the following operations to start polishing process again, if needed.
・ Push “ST1” button with the front door open (“1.” and pad usage counter are displayed on ST and TIME LED, and ”1.” start to blink).
・ Set the disc to turn table, put one-drop compound on the disc.
・ Close the front door (Washing process is skipped).
6. The front door opens automatically after polishing process is complete.
Emergency stop during a repair.
Press “STOP” button.
Press stop button again to open door.

5.4 How to switch the machine between CD/DVD and Blu-ray repair modes:
With the machine turned on and the door open, press and hold the Stop (Red) button until the “cd” in the ST screen changes to “bd”. Now the machine is set up to repair Blu-ray discs. The machine will do a level 1 to level 4 repair in bd mode. Level 1 is the same in “cd” or “bd”. Level 2-4 you will need to use the purple pad with compound and then switch to the black pad for level 1. You must apply a circle of compound around the middle of the disc each time the Purple pad runs a process.5.5 Pad usage counter function
The Pad usage counters are for knowing when to exchange each repair pad. The counters are displayed on the LEDs.Check each counter before operation, and exchange the pad for a new one when necessary. All sanding pads are good for 50 repairs only. The Black polish pad is good for 250 repairs only.
After exchanging the repair pad, be sure to reset the corresponding counter.
<How to check the pad counter>
Press “ST1-5” button with Front door open, the pad usage counter corresponding to the button pressed is displayed. Repair process number (“1.”-“5.”) is displayed on the left side of ST LED, and the counter value (0-999) on the right side of ST LED and TIME LED.

<How to reset the pad counter>
With the pad count being displayed, press and hold the same button again for more than 3 seconds until the counter value is reset to “0”.

Contents.
- 1. How to install
- 1.1 Contents of packing
- 1.2 Placement of machine for installation
- 1.3 Moving the unit
- 2. Description and Function of each part
- 3. LED Display
- 4. Pad and ST (Repair process) number
- 5. How to use
- 5.1 Preparation before operation
- 5.2 Power on and off
- 5.3 Operation process for repairing disc
- 5.3.1How to switch between CD/DVD and Blu-ray repair modes
- 5.4 Changing between CD/DVD and Blu-ray repair
- 5.5.Pad usage counter function
- 6. Error occurrence
- 6.1 Error code
- 6.2 Error reset
- 6.3 Error List
- 6.5 When the front door does not open
- 7. Daily maintenance
- 7.1 Daily cleaning
- 7.2 2 Daily inspection
- 7.2.1 Pad holder Velcro
- 7.2.2 Center seal
- 8. After Service
- 9. Specifications
- 10. Wiring Diagram
- 11. Maintenance Parts